Home

Montessori Bedroom Inspiration for Your Child

Montessori bedroom, We did it friends! We made the big jump to switch Sophie (age 14 months) to a Montessori inspired room. Call us crazy, but we’re super excited!

Montessori Bedroom Inspiration for your child- DIY Mama

Montessori Bedroom

This past weekend we took out Sophie’s crib so there would be no turning back! It’s not very conventional to move a child of this age to a big kid bed but we think it’s best for Sophie. It will help aid her in being able to lay down when she’s tired or read a book if she wakes up at 6a (before Mommy).

Montessori Bedroom Inspiration for your child- DIY Mama

Her dresser has stayed pretty much the same from the start. Her drawers are still organized as they were in her nursery post. Bags and sweatshirts are at easy access with all the necessary diaper changing supplies on top of the dresser. The white cord hanging down in the corner is her camera. We attached the dresser to the wall and covered the outlet so she won’t be tempted to mess with the plugs.

Montessori Bedroom Inspiration for your child- DIY Mama

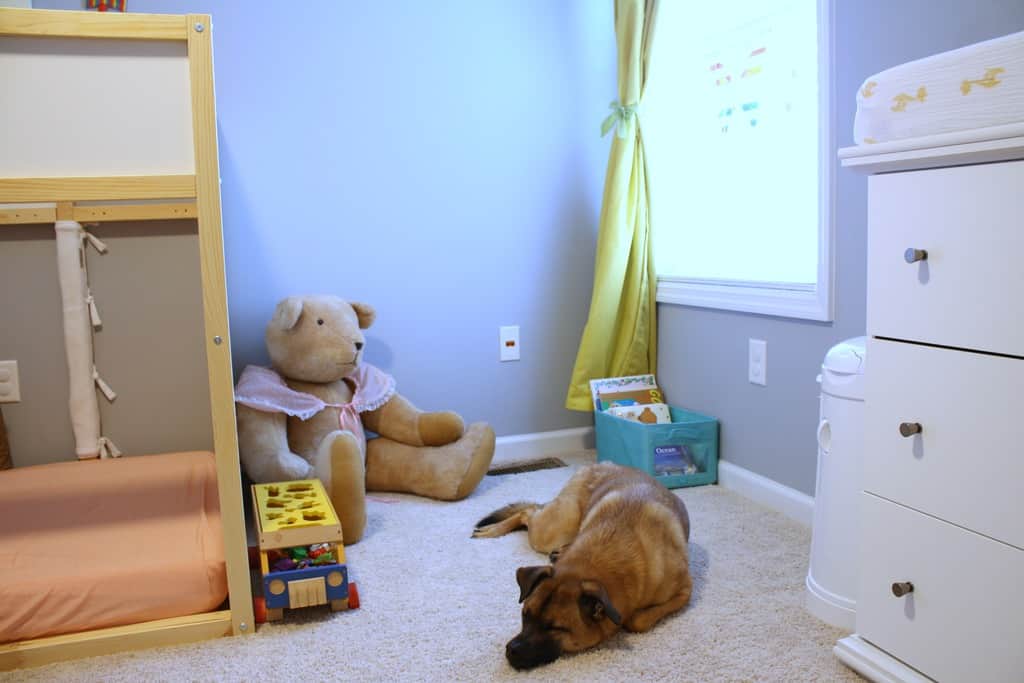
Sophie has a reading nook by her window. Over time I’m sure there will be pillows and blankets and art in this area but for now she likes sitting in this area and looking at her books with Bear. Also, that animal sorting bus in the lower corner is her favorite toy of all time. It’s a hand me down from her niece and I haven’t found it anywhere online, but if you’re looking for a toy for your little one, there are similar toys online.

Montessori Bedroom Inspiration for your child- DIY Mama

Sophie’s new bed is the Kura reversible bed from IKEA. There are so many fun ways to customize this bed. We’re thinking of making it more cozy with some kind of top and curtains. We put a temporary body pillow along the wall to make her more comfortable. She’s not a fan of blankets which is why her bedding is just a fitted sheet. With her bed being on the floor, when I see her rubbing her eyes or yawning, I can say ‘do you want to take a nap with Elmer (her elephant)?’ and she’ll walk into her room and lay down with him.

Montessori Bedroom Inspiration for your child- DIY Mama

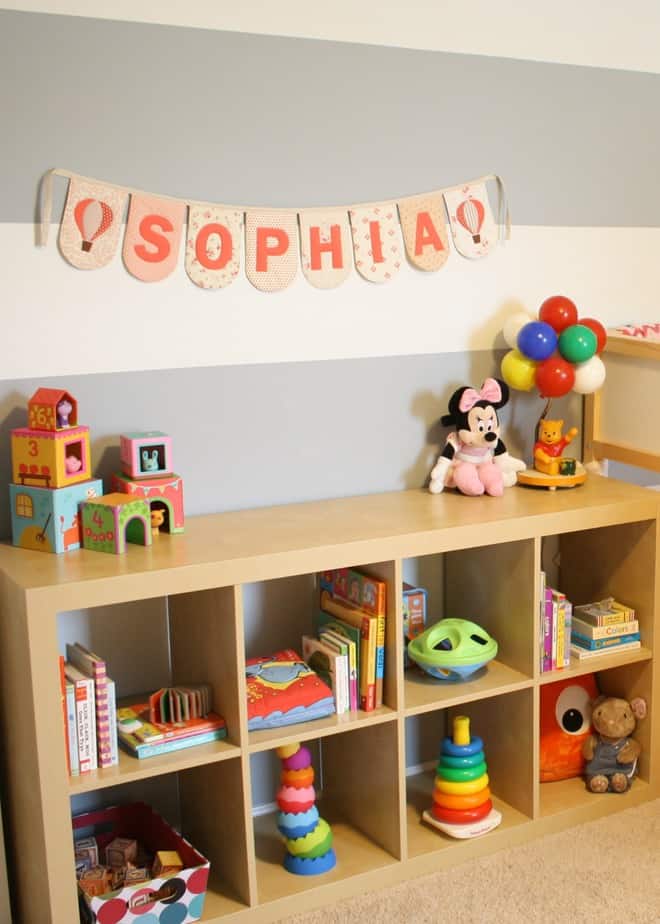
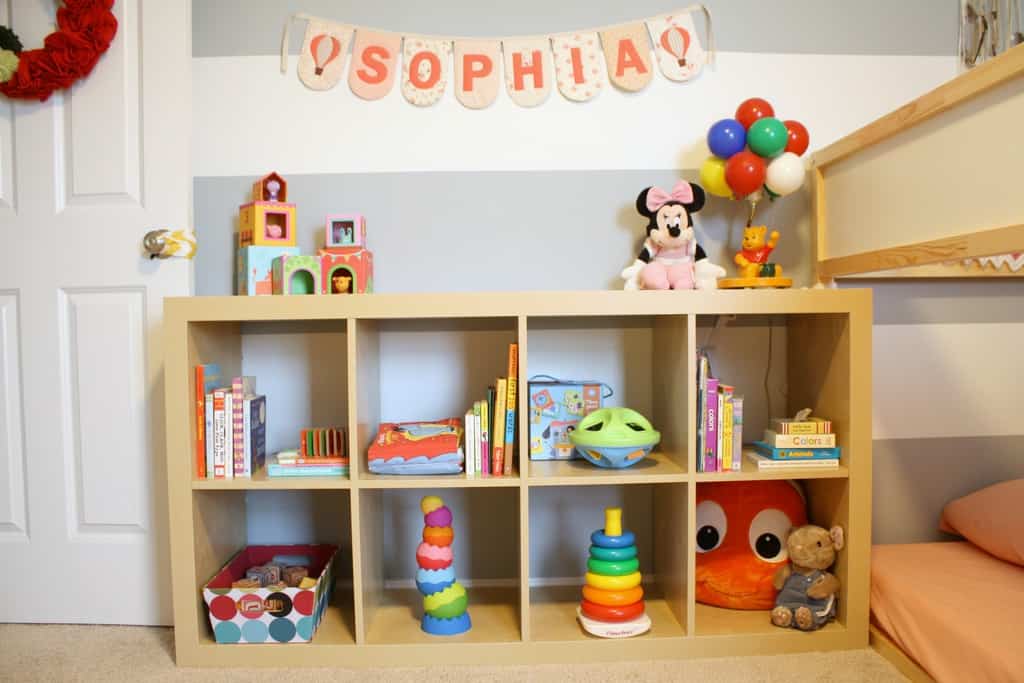
Montessori Bookshelf

Sophie’s bookcase is minimal with some of her favorite toys and books. I didn’t put many books on the shelves, knowing that for now, I’ll be putting everything back on the shelves when she empties them. We wanted to have learning toys on her shelf that can grow with her as she learns how to play with them better. The Minnie on the top shelf is her sound machine for naps and the Winnie the Pooh is my old lamp/music box from when I was little. Her closet has the rest of her library, more toys and her hamper. Everything is attached to the wall or latched shut so she can’t hurt herself while playing in her room.

Montessori Bedroom Inspiration for your child- DIY Mama
We’ve all loved the new setup of Sophie’s room. We’ve been a bit sleep deprived while she’s getting the hang of actually laying in her bed throughout the night time, but we’re only on the second day.

When did you move your toddler to their big kid bed? How was the transition? Any tips on keeping them in the bed but not blocking their access to get up when they want? Wish us luck over these next couple weeks! We’ll be going back and forth between bed, crib and pack and plays with traveling for the holidays!

Shop This Room:

Kura Reversible Bed

Kallax Bookshelf

Name Bunting

Popular Montessori Parenting Posts:

Preschool Montessori Bedroom

Our Montessori Life

Kids Chore List for Young Kids

What’s in my: Diaper Bag

Hello Beauts! I’ve made it one more day without crying for the smiles of my Sophie! I have been doing all kinds of things that are really hard to do with an 11 month old. Today I’m sans car while it gets detailed, (from our road trip in July!) which I wouldn’t feel safe doing while having Sophie here. We (yes, WE) organized Sophie’s clothes for fall to determine what we needed to stock up on and I bought all her new fall (warm) clothes. I also re-organized her diaper bag which needed it desperately! Which brings me to:

diaper-bag-pinterestI feel a bit ashamed to call myself a Girl Scout with the shape our diaper bag was in. We’re lucky to have not had any craziness happen while the bag has been in such disarray. First step: dump everything from the bag to determine what needs to stay and what needs to be put away. Continue Reading about What’s in my: Diaper Bag

DiY Pergola Curtains

Yippeeeeeee! I’m finally finished with my one summer craft that I REALLY wanted to complete before summer was out. I made curtains for our pergola to make our deck feel more welcoming. The deck is very large and we Jeffrey added a privacy surround this summer in addition to the pergola. There was a lot of wood going on and I wanted to soften it up by using fabric. We had breezy sheers out there last year but it is insanely windy where we live and they were constantly tangling. I saw a tutorial on how to make your own pergola curtains on A Beautiful Mess and knew I had to give it a try.

Pergola CurtainsLaura did such a phenomenal job on her tutorial that I don’t think it warranted the ‘Epic Projects (Advanced)’ tag that it has. It was a long process, which would have been even longer if I was doing more than the two panels I did, but it was a very straight forward process. All of the materials were easy to find locally and much more inexpensive than buying heavy duty outdoor curtains. **UPDATE** If you live in a very windy area, these will still not be heavy enough curtains. I suggest adding more weights or figuring out a more permanent solution to softening up your area. I tried multiple tie-back methods, none of which worked permanently. Every few days I had to re-tie the curtains (especially during rainy season).

Materials Needed:
Heavy fabric -I used 6 yards* (depending on how windy it is where you’re located)
Fabric scissors
Grommet kit (total grommets used 14)
Cup hooks 7/8″ (14)
Safety cup hooks (4)
White chain
Hammer
Bolt Cutters (to cut the chain)
Sewing machine (unless you want to hand sew)
Waterproofing spray**

*You’ll want to measure the height and width of your pergola and determine how drapey you want your fabric before buying your fabric. You could also skip the waterproofing step and buy outdoor fabric but it will be more expensive. If you are doing many panels, you may have to order your fabric from your fabric store because they don’t often carry several bolts of the same fabric. **I used Scotch Guard but it has not been tested. The reviews on Amazon were all the research I did for choosing what type of fabric waterproofing spray to use.

Pergola CurtainsYou’ll likely need to sew hems on all sides of your fabric. If you are not confident with a sewing machine, I’ve used strong heat n’ bond on curtains before but never outside, so you’ll be taking a risk. I made all of the hems the same width other than the top hem where the grommets will go. I used a grommet to measure how wide I wanted the top hem.

Pergola CurtainsI’m not a numbers girl so I didn’t measure anything until it came to adding the grommets (only because I screwed up one section by not measuring.) A trick I used, to make sure it was an even hem all the way across, was to line up my first set of pins as shown.

Pergola CurtainsAdding the grommets was the most fun part. Follow the instructions on the back of your grommet kit (in case it’s different than mine.) Make a small X with your scissors in the location you want your grommet. Do not make your X too large, start small and make it larger if necessary. Be sure to use some force while hammering your anvil to get the grommet nice and snug. I found this part quite therapeutic!

Pergola CurtainsOnce all of the hems are sewn and the grommets are added, it’s time to add the cup hooks to the pergola. As I said before, I didn’t measure out where my grommets went, so I added the outside hooks first. I knew the area I wanted the curtain to span so I drilled tiny holes and screwed in the two outside cup hooks first.

Pergola Curtains

Once those were up I hung the curtain so I could hold up where the grommets met the board and used them as a template to drill my holes. If you measure out where you put your grommets, you’ll be able to measure where you should drill for your hooks.

Pergola Curtains

Things are looking amazing now! The next step was to figure out where I wanted the tie backs. Since I knew how windy it is, I chose to do my tiebacks a bit higher than I normally would, so there would be a lot of fabric hanging down under the chain. I drilled two small holes on either side of the 4×4, screwed in the safety hooks and hung the chain.

Pergola Curtains

Before cutting the chain, I let my curtains be outside all afternoon. I wanted to make sure the chain was going to be a good way to keep my curtains secure. I simply snipped the chain before repeating this step on the other curtain panel. You could also use rope or make a strip of fabric to bring in a pop of color. I think it would be cute to have a bright teal or yellow strip of fabric and use a grommet on each end to attach to the safety hooks.

Pergola CurtainsNow that the curtains are hung, I left them up to spray the waterproofing on each side of the panels. I left them flying in the wind for a day to dry out completely. This portion was difficult for me because of the wind. If you can, choose a day that’s not windy and not going to rain.

Pergola CurtainsPergola CurtainsI love it so much! I feel like it makes our area more welcoming and a bit more resort like. I am extremely excited to sit out on the deck in a few weeks once it cools off and into the fall when we’ll need sweaters and apple cider to keep warm. There’s still a bit more I’d like to do in the way of styling but that will have to wait until the fall flowers come to the nursery. How have you dressed up your outdoor area? Do you add fun pillows or rugs to bring in a pop of color? I love that!

Bedroom Gallery Wall

Hello Friends! I hope your weekends were exactly what you’d hoped for, whether that be full of exciting events or relaxing at home! We had a great weekend visiting with family, doing a few house projects and taking Sophie to the pool. One of the house projects was a very simple update of replacing our curtain rods with new double rods so we could add sheers in our bedroom. Doing this reminded me that I wanted to post on the small gallery wall I’d made for above our bed.

bedroom-gallery-wall

You know how the bedroom is often the last place you decorate in your home? That was the case in our home as well. Our bedroom is still in the decorating phase but has gotten one step closer by having some art above our expansive vaulted wall that our bed sits against. In order to make the gallery wall a more relaxed feel, I wanted the frames to be hung as well as leaning against the wall held by photo ledges. I picked up two photo ledges at IKEA as well as a few frames. In order to not put extra holes in the wall, I used 3M velcro to hang the frames.

3MVelcroI made templates of each frame with newspaper and moved them around until I got the layout I thought looked the best.

templateNotice the thin strips of newspaper? I even made templates for the photo ledges so I’dknow exactly where to put them. Having the template made hanging the ledge super easy because I held the shelf, held up a level and drilled the screws straight in, making sure to pull out the newspaper before the ledge got flush against the wall.

photo-ledgeI made sure to fill all the frames with art before hanging them to avoid pulling them off the wall. I did a color theme by accident but it worked out really well! The bottom right print is a page of scrapbook paper as a place holder until I can find a piece more suitable. I made the two in the middle on the bottom ledge. The ‘hello love’ was a free printable and the blue floral piece is a tea towel my sister made. I already had the ‘look on the bright side’ print as well as the city print. Just showing it doesn’t cost a lot to make a statement on a wall. Just a few frames (I only bought the two outside grey frames) and photo ledges! Fill with art on hand or make your own!

gallery-wall-closeI like this smaller size of art layered together rather than a full wall of frames. I was tempted to do a full wall but felt it would be too busy and encroaching for a bedroom.

gallery-wallSo there’s my little addition to decorating more of our bedroom. Next stop: wall sconces for reading! In the earlier photos, you can see the old curtain rods and lamps we used to have on our nightstands. If you’re interested, here’s the list of where we got items from this shot of our bedroom:

  • Curtains and teal pillow: Pier1
  • Sheers: Target
  • Curtain Rods and Pullbacks: Lowes
  • Grey Pillows, Nightstands and Frames: IKEA
  • Duvet Cover: West Elm
  • Headboard: DiY

What do you have above your bed? Is it a piece of art that is calming or energizing? What about on the other walls in your room? I like to fill every space of wall with art but in the bedroom I’m sorta liking seeing some wall space.


What’s in my…Car?

Hey everybody! Today I’m starting a new series called What’s in my ______? I’ll be doing posts once or twice per month for this organizing series. I’m choosing areas of my life that seem to get disorganized easily and showing you how I’m fixing the problem. I wanted to start with my car because 1. It was a royal mess from our last trip to Indiana and 2. It seems most people who have kids have a hard time keeping their cars organized!

what's-in-my-car

Here is the state my car was in before organizing it (not pictured: stroller and pack n’ play that was just removed):

trunk car-seat center-consoleNot THAT bad other than the trunk, right? WRONG! It bugs me really bad when my car isn’t clean. This doesn’t even show all the dust, hand prints, dirty windshield, dog hair and saw dust that has accumulated throughout the car. I also get frustrated with hearing all the change in the center console shifting around. First step: Empty everything that does not belong in the car.

clean-trunkI like to keep my trunk empty so I don’t have to worry about the stroller getting caught/breaking things and so there is always room if I decide to go grocery shopping on a whim. I’ve left my re-usable bags and umbrella so they’re easily accessible. We LOVE these liners for our floors as well. I carry a lot of flowers in our trunk that always spill and get top soil everywhere. This mat can easily be taken out, shook off, vacuumed and hosed down if needed.

car-kitI’d originally made a car kit to keep in my car with safety equipment for winter and one for random ‘you might need one of those someday’ type situations. This car has this nifty tray in the trunk that holds everything I need.

Items in said car kit:

  1. Lint Roller
  2. Emergency Food Bar
  3. Fix-A-Flat
  4. Emergency Shovel/Pick/Compass
  5. Deck of Cards
  6. Baby Wipes
  7. Kleenex
  8. Hand Sanitizer
  9. Handheld Light
  10. Flares
  11. Flash Light
  12. Band-Aids
  13. Nail Clippers
  14. Tweezers
  15. Notebook & Pen
  16. Collapsible Dog Water Bowl
  17. Screwdriver
  18. Large Ziplock Bag
  19. Socket Wrench for Wheels
  20. Diaper
  21. Tampon
  22. Bungee Cord
  23. Ponchos
  24. Jumper Cables
  25. Hand Warmers
  26. Hand Held Ice Scraper
  27. Mini Sewing Kit

This may be a bit much but I had everything on hand, it fit in my car and I’m a Girl Scout- Always Be Prepared!

My next messy space was my center console:

clean-center-consoleI kept everything in there but organized it better. I used a mini M&M container to hold all my quarters for parking downtown. I also put a $20 in there in case I’m ever stranded for gas or need taxi money. I also have a second flashlight, hand lotion, tire gauge, pen and my local discount cards. I don’t like filling my wallet with punch/rewards cards so I keep them in my car since we almost always drive my car. The bottom portion has plenty of room to grow but holds hand sanitizer, a few CDs, AUX cables and phone chargers. My glove box is also empty which I love because I’m sure I’ll want that easy access space as Sophie gets older.

Do I have entirely too much stuff in my car?? I feel it’s better to be safe than sorry. Unfortunately we can’t access the trunk tray if our car is packed for a road trip. How do you keep things organized in your car? What else is a must-have for your ride?


Google+