photos

1st Birthday Party Ideas

Happy Happy Friday! I’m super pumped about this Friday Finds post because I got to do it around 1st Birthday Party Ideas for Sophie’s Birthday in two months. Pinterest is INSANE with making it look like you have to do a super massive party for a child’s first birthday. The ideas I saw on there were overwhelming! I decided I wanted to try to DiY her party using supplies we already have. Once I got a better idea of what I wanted her party to look like, I realized I will have to buy a few lot of balloons and some floral pins but I’d say that’s pretty good for me (usually I spend a bit too much on birthday decorations.) I decided I wanted Sophie’s theme to be happy/fun/colorful just like she is. She has the biggest personality to match her larger than life smile. I thought a ‘confetti/sprinkles’ type party would suit her perfectly.

first-birthday-ideas

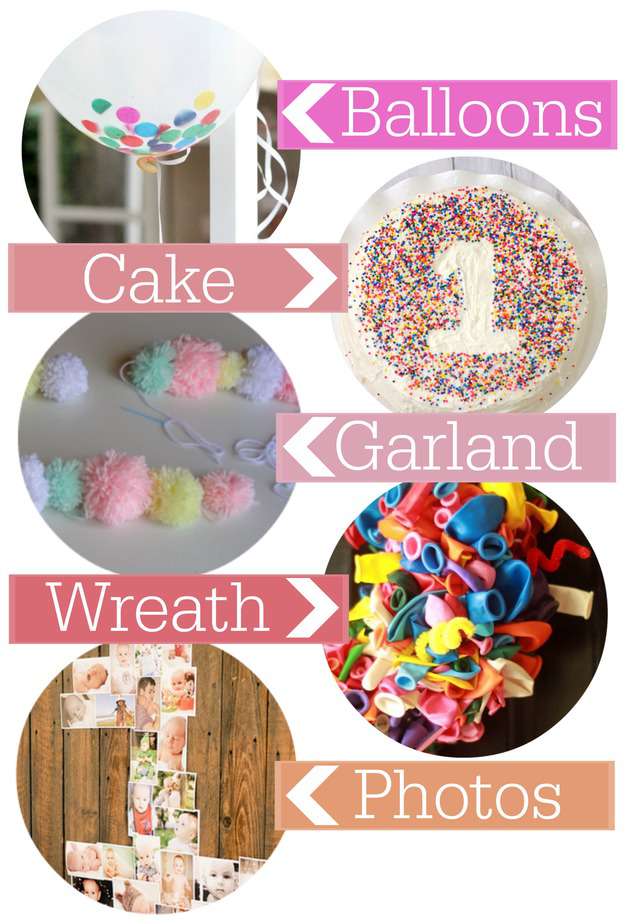
  1. Confetti Balloons are SO fun and I knew I had to try my hand at them for her party. I love the huge round balloons but those are pretty pricey so I thought I’d get more bang for my buck by using regular, clear balloons. Kristen wrote an awesome tutorial at KojoDesigns when she made them for her little girl’s party.
  2. Cake. Duh. Very important part of every party but especially a little girl’s first birthday party. I love the whimsical 1 on this birthday cake by Kristine at Kristine’s Kitchen. Her cake sounds phenomenal too but I think I’ll have enough stuff going on that I’ll probably buy a mix.
  3. I’m a big garland fanatic. I make a new garland for every party we have. I have a Sophia bunting that hangs over her crib that I’ll use somewhere but I also wanted to make some pompom garland that can go in her room once the party’s over! I just got a clover pompom maker and Tara at One Stylish Party has a great tutorial on how to use the pompom maker.
  4. Big Ole Welcome Wreath! I wanted to make a wreath that I could use every year for birthday parties. I thought this balloon wreath made by Erin at Just Two More Seconds screamed ‘birthday party and fun to be had inside!’
  5. Finally, I MUST show a year of photos of my baby girl. There will probably be a slide show or video playing but I thought this 1 display of photos shared by Emily at Babble was seriously cute. I only have about 3,000 photos to go through from this past year…nbd.

I’m just tickled to be thinking about celebrating our little girl with our immediate family and some of her favorite friends! I wanted her gift from us to be fairly small but meaningful and I’d seen Tamara post a personalized children’s book called The Little Girl Who Lost Her Name. She’s obviously too young to read this book but we can start reading it to her now  while she looks at the beautifully illustrated pages. What did you do for your child’s first birthdays? What did you learn from that party that you will remember for all future parties? Now I want cake.

Watermark Your Photos-PicMonkey

Hey techies! Today I’m sharing another PicMonkey tutorial on how to watermark your photos. I did a post on making a PicMonkey Invitation a couple months ago and several people have asked what program I use to make my graphics. PicMonkey is extremely user friendly and free (unless you want to upgrade to Royale.)

watermark-with-picmonkey

I, personally, don’t use watermarks on my photos because I use a LOT of photos in my blogs and honestly, I just forget. It has nothing to do with the difficulty of the task. The first step is to open www.picmonkey.com in your browser (I know…duh…but it is the first step.) Next we’ll make a watermark that you can use to stamp onto each of your photos so you won’t have to re-create a new watermark every time you edit a photo. Click on the design button on PicMonkey’s homepage.

transparent-canvasIn the ‘crop’ menu on the left, click the box for ‘transparent canvas’ and hit ‘apply.’ This will make your watermark only show the text/image over your photo.

textAt this point, you’ll most likely want to use the ‘add text’ menu or the ‘overlay’ menu (the butterfly.) I wanted my name as the watermark so I clicked the ‘Add Text’ button and a text box popped up on my canvas as well as a text window to adjust the size, orientation, color etc.

font-fadeFor the purpose of this tutorial, I left the text black but for my actual blog I would use white and fade it so it would show up better on my photos. I might even make a white version and a grey version in case I have an image with a white background. The above photo actually has the window for the arrow rather than the text but I wanted to point out where the fade slider is for the text or image. I love PicMonkey because you can use their free fonts, their Royale fonts and all of your existing fonts on your computer. If you want a TON of fonts but don’t want to pay the extra for Royale you can download free fonts at DaFont.com or Google.com/fonts.

geometricIf you want some sort of boarder around your text you can use the ‘geometric’ option from the ‘overlay’ menu. I chose a black rectangle that I enlarged and rotated. I right clicked on the black rectangle to bring up a menu where I ‘sent to back’ so it would fall behind my text.

layered-boarderThere are literally billions of different options for making your watermark. A lot of bloggers write out their name or full url and place it in the lower right or left hand corner of each picture. Some bloggers have more of an image stamped with their ‘seal’ somewhere on their photo. You will only want to have the border if you want it to really stand out on your photo.

cropYou’ll want to use the ‘crop’ menu to crop your photo as ‘no fixed proportions’ so you can outline the area you’ve designed.

save-sizeOnce you’re satisfied with your watermark, hit ‘save’ at the top of your screen. Name your file and re-size it’s dimensions. You’ll want to change your size to something much smaller; anywhere from 100-300 depending on how large you want your watermark. You can also just leave it large and re-size it when adding it to your photo.

adding-watermarkTo add your watermark to a photo, open your photo in a new PicMonkey tab and click ‘edit’ from the homepage. Once you’ve selected the photo you want to watermark, click the ‘overlay’ menu (butterfly) and click ‘your own’ to add your watermark. Resize as needed.

watermark-example-1Here is the watermark I made for this tutorial but I’ve also made a few others in the past when I was trying to decide if I wanted to watermark my photos.

watermark-example-2watermark-example-4watermark-example-7Yes, the theme for the photo bomb was ‘my babies.’ If I come into a problem with people stealing my photos, I’ll probably start adding a watermark. For now, the disclaimer on my ‘about me’ page is comfort enough. I may be too trustworthy but that’s ok. Have you run into copy write problems with your photos in the past? Do you use a watermark now? Aren’t my babies the cutest?

*For a tutorial on how to make the Nutella Parfait on the title photo, click here and for the Gooey Granola Bars click here (both of which will have you thanking me.)

Google+