sewing

Preschool Sewing Kit

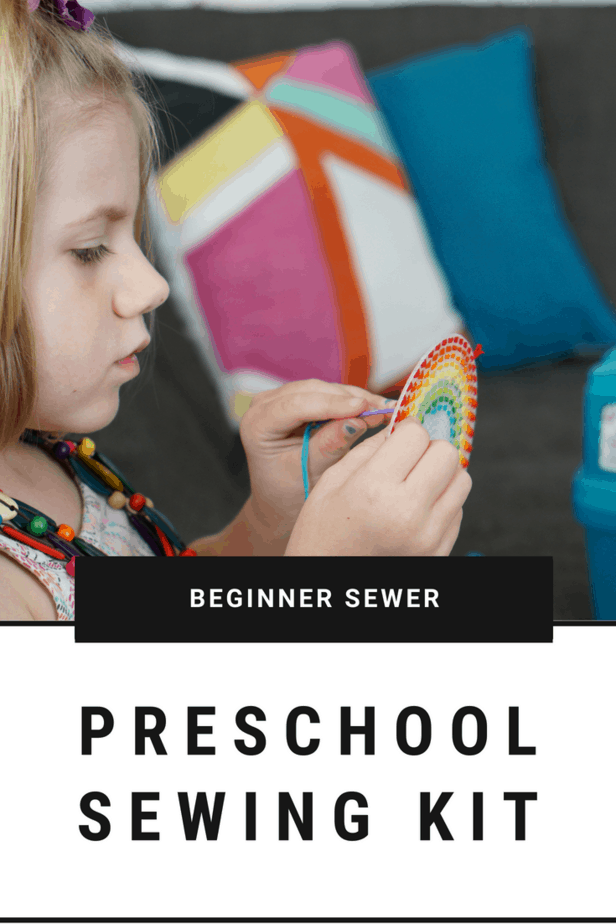
Preschool Sewing Kit- perfect quiet activity for my little one. Helps with her patience, fine motor skills and giving Mom a few extra minutes to do my thing. It’s even more helpful now that I have a new baby and she’s feeling left out with how much time the baby requires. Activities like this are perfect for keeping her mind and hands busy but still be able to hang out with us. The first time we did this sewing activity she spent two hours happily singing and sewing with me!

Preschool Sewing Kit DIY perfect for young sewers just beginning. Fine motor skills, patience and focus are all used for this project.

Preschool Sewing Kit DIY perfect for young sewers just beginning. Fine motor skills, patience and focus are all used for this project.

Preschool Sewing Kit:

(these are affiliate links but feel free to find your favorite supplies at your local store)

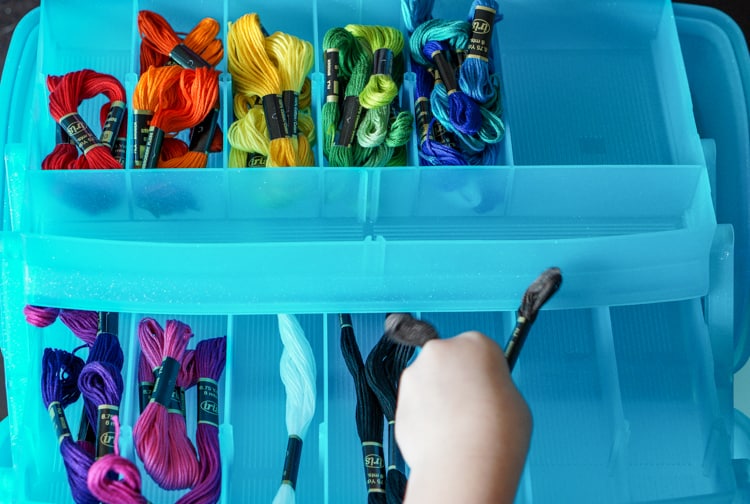
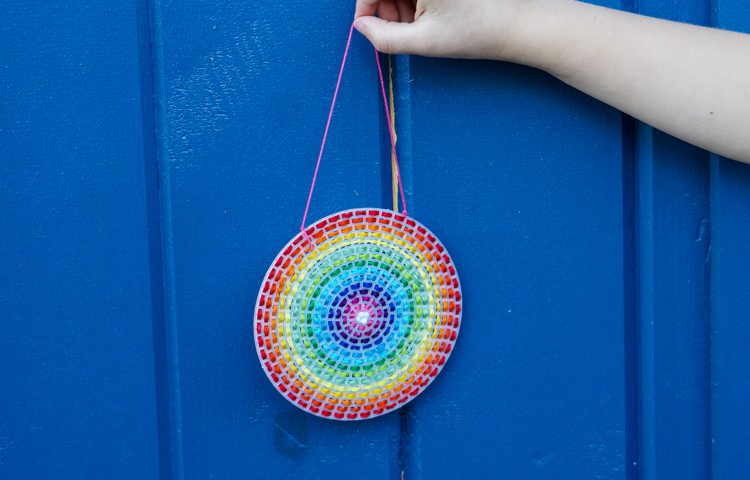
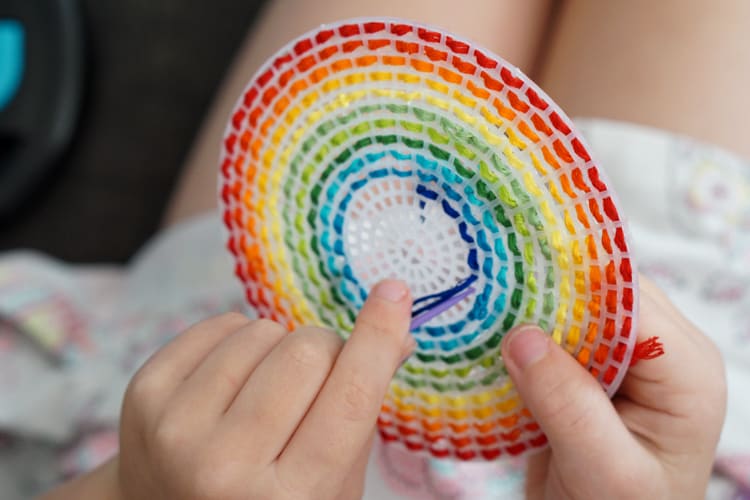
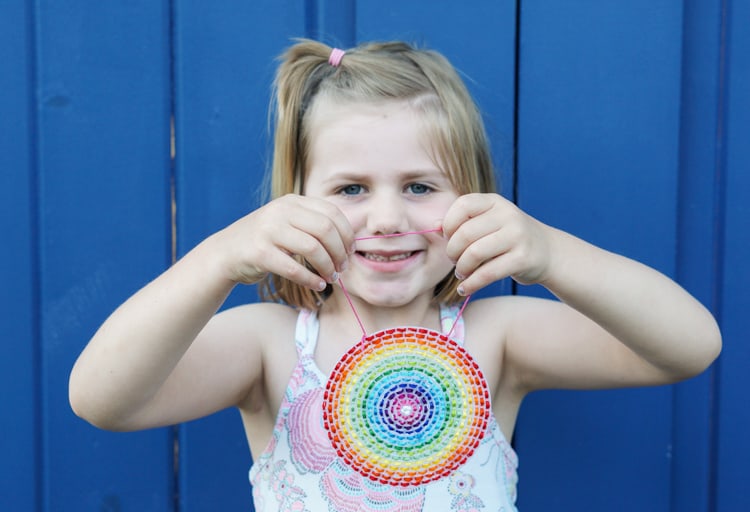
This would make an awesome Christmas gift or Birthday gift for any preschool aged child. I surprised our daughter with it as a Big Sister gift and had her help me put it all together. One of her favorite things is to see what’s in my bags when I get home from the craft store or party store so she was super excited that it was all for her! She loved sorting all of the colored thread in rainbow order and that there were little compartments for each thing. I’d found plastic mesh canvases that were in little shapes at the craft store but also bought a large sheet that we cut up for larger projects.

Preschool Sewing Kit DIY perfect for young sewers just beginning. Fine motor skills, patience and focus are all used for this project.

Preschool Sewing Kit DIY perfect for young sewers just beginning. Fine motor skills, patience and focus are all used for this project.

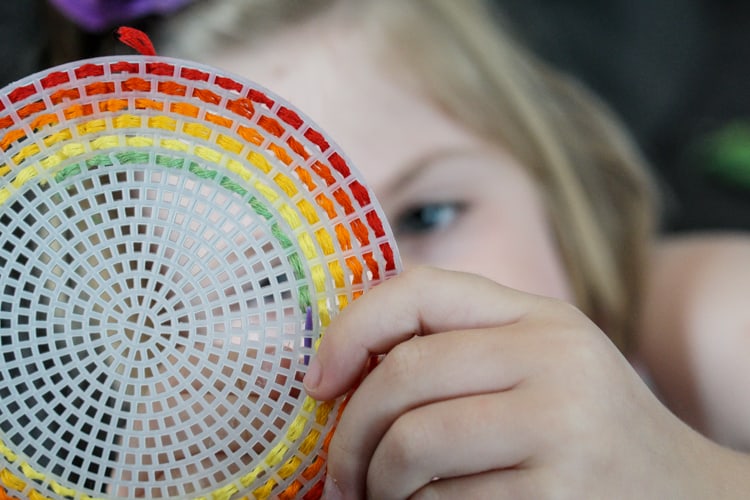
As I mentioned, she sat for two hours sewing her first project for her sister (this was a few days before she was born) and couldn’t have been happier to hang it up in her room for her. Such a great memory for me to be able to work on a new craft with her and start her love of sewing. It also sparked her interest in making thread bracelets which lead to beaded bracelets. I dusted off my huge container of beads and we made tons of jewelry for all of our friends and family.

Preschool Sewing Kit DIY perfect for young sewers just beginning. Fine motor skills, patience and focus are all used for this project.

Preschool Sewing Kit DIY perfect for young sewers just beginning. Fine motor skills, patience and focus are all used for this project.

I will be doing a second post once we’ve graduated from this preschool sewing kit and have added embroidery hoops and real needles. Is there anything I’m forgetting to add to her sewing kit or any other activities your kids love doing by themselves?

Posts related to ‘Preschool Sewing Kit’:

Quiet Activities for Preschoolers

Making Creativity the Norm for Kids


Pin it for later:

Preschool Sewing Kit DIY perfect for young sewers just beginning. Fine motor skills, patience and focus are all used for this project.

Let’s DIY

Whew. This week was a doozie. And I don’t use that word often. I could seriously go for a ‘no responsibilities crafting weekend’ right about now (and a martini for good measure). I’ll just have to sneak in a few projects here and there during nap times for a while, and I’m ok with that. So, what do you say? Let’s DIY!

Simple DIY crafts to make this weekend
Here are my favorite DIY projects for this week: Continue Reading about Let’s DIY

Lets DIY

It’s FRIDAY! All week has felt like Saturday to me though because we’re on vacation! We’ve gotten lots of projects done, but more importantly, we’ve gotten lots of play time in as a family. We stayed in town and checked out a new park that we’re now in love with. Jeffrey and I also went on a date and found our new favorite restaurant in town! I wish this week could last forever because Soph and I both love having Jeffrey around to play with.

DIY Craft Projects
Here are my favorite DIY projects for this week: Continue Reading about Lets DIY

DiY Pergola Curtains

Yippeeeeeee! I’m finally finished with my one summer craft that I REALLY wanted to complete before summer was out. I made curtains for our pergola to make our deck feel more welcoming. The deck is very large and we Jeffrey added a privacy surround this summer in addition to the pergola. There was a lot of wood going on and I wanted to soften it up by using fabric. We had breezy sheers out there last year but it is insanely windy where we live and they were constantly tangling. I saw a tutorial on how to make your own pergola curtains on A Beautiful Mess and knew I had to give it a try.

Pergola CurtainsLaura did such a phenomenal job on her tutorial that I don’t think it warranted the ‘Epic Projects (Advanced)’ tag that it has. It was a long process, which would have been even longer if I was doing more than the two panels I did, but it was a very straight forward process. All of the materials were easy to find locally and much more inexpensive than buying heavy duty outdoor curtains. **UPDATE** If you live in a very windy area, these will still not be heavy enough curtains. I suggest adding more weights or figuring out a more permanent solution to softening up your area. I tried multiple tie-back methods, none of which worked permanently. Every few days I had to re-tie the curtains (especially during rainy season).

Materials Needed:
Heavy fabric -I used 6 yards* (depending on how windy it is where you’re located)
Fabric scissors
Grommet kit (total grommets used 14)
Cup hooks 7/8″ (14)
Safety cup hooks (4)
White chain
Hammer
Bolt Cutters (to cut the chain)
Sewing machine (unless you want to hand sew)
Waterproofing spray**

*You’ll want to measure the height and width of your pergola and determine how drapey you want your fabric before buying your fabric. You could also skip the waterproofing step and buy outdoor fabric but it will be more expensive. If you are doing many panels, you may have to order your fabric from your fabric store because they don’t often carry several bolts of the same fabric. **I used Scotch Guard but it has not been tested. The reviews on Amazon were all the research I did for choosing what type of fabric waterproofing spray to use.

Pergola CurtainsYou’ll likely need to sew hems on all sides of your fabric. If you are not confident with a sewing machine, I’ve used strong heat n’ bond on curtains before but never outside, so you’ll be taking a risk. I made all of the hems the same width other than the top hem where the grommets will go. I used a grommet to measure how wide I wanted the top hem.

Pergola CurtainsI’m not a numbers girl so I didn’t measure anything until it came to adding the grommets (only because I screwed up one section by not measuring.) A trick I used, to make sure it was an even hem all the way across, was to line up my first set of pins as shown.

Pergola CurtainsAdding the grommets was the most fun part. Follow the instructions on the back of your grommet kit (in case it’s different than mine.) Make a small X with your scissors in the location you want your grommet. Do not make your X too large, start small and make it larger if necessary. Be sure to use some force while hammering your anvil to get the grommet nice and snug. I found this part quite therapeutic!

Pergola CurtainsOnce all of the hems are sewn and the grommets are added, it’s time to add the cup hooks to the pergola. As I said before, I didn’t measure out where my grommets went, so I added the outside hooks first. I knew the area I wanted the curtain to span so I drilled tiny holes and screwed in the two outside cup hooks first.

Pergola Curtains

Once those were up I hung the curtain so I could hold up where the grommets met the board and used them as a template to drill my holes. If you measure out where you put your grommets, you’ll be able to measure where you should drill for your hooks.

Pergola Curtains

Things are looking amazing now! The next step was to figure out where I wanted the tie backs. Since I knew how windy it is, I chose to do my tiebacks a bit higher than I normally would, so there would be a lot of fabric hanging down under the chain. I drilled two small holes on either side of the 4×4, screwed in the safety hooks and hung the chain.

Pergola Curtains

Before cutting the chain, I let my curtains be outside all afternoon. I wanted to make sure the chain was going to be a good way to keep my curtains secure. I simply snipped the chain before repeating this step on the other curtain panel. You could also use rope or make a strip of fabric to bring in a pop of color. I think it would be cute to have a bright teal or yellow strip of fabric and use a grommet on each end to attach to the safety hooks.

Pergola CurtainsNow that the curtains are hung, I left them up to spray the waterproofing on each side of the panels. I left them flying in the wind for a day to dry out completely. This portion was difficult for me because of the wind. If you can, choose a day that’s not windy and not going to rain.

Pergola CurtainsPergola CurtainsI love it so much! I feel like it makes our area more welcoming and a bit more resort like. I am extremely excited to sit out on the deck in a few weeks once it cools off and into the fall when we’ll need sweaters and apple cider to keep warm. There’s still a bit more I’d like to do in the way of styling but that will have to wait until the fall flowers come to the nursery. How have you dressed up your outdoor area? Do you add fun pillows or rugs to bring in a pop of color? I love that!

Google+