Craft

Let’s DIY

Hello and happiest of Fridays to you! This week’s Let’s DIY was super tough because there were so many amazing projects! Not only would I love every one of these for myself, but I think all of these would make great gifts!

15.2.27_Lets_DIY
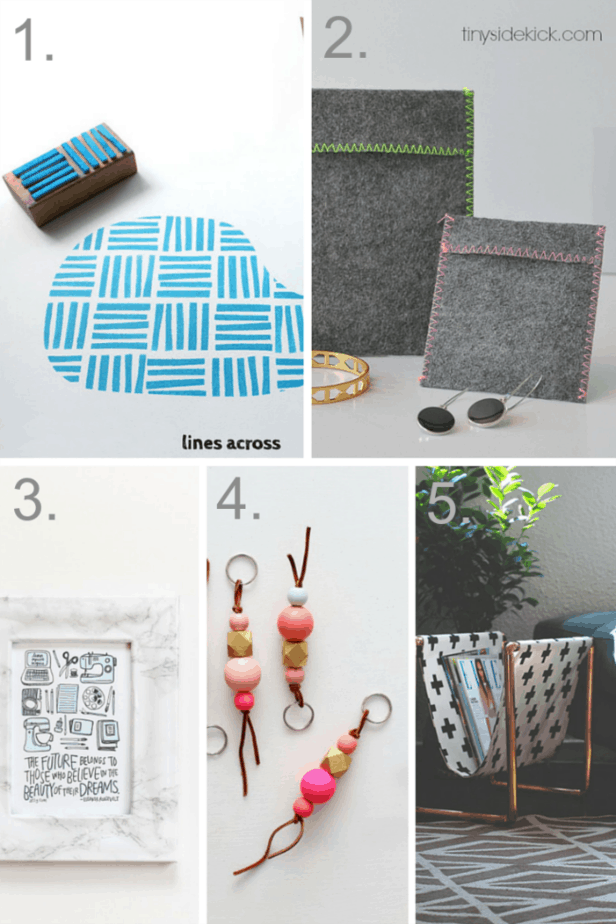
Here are my favorite DIY crafts from this past week:

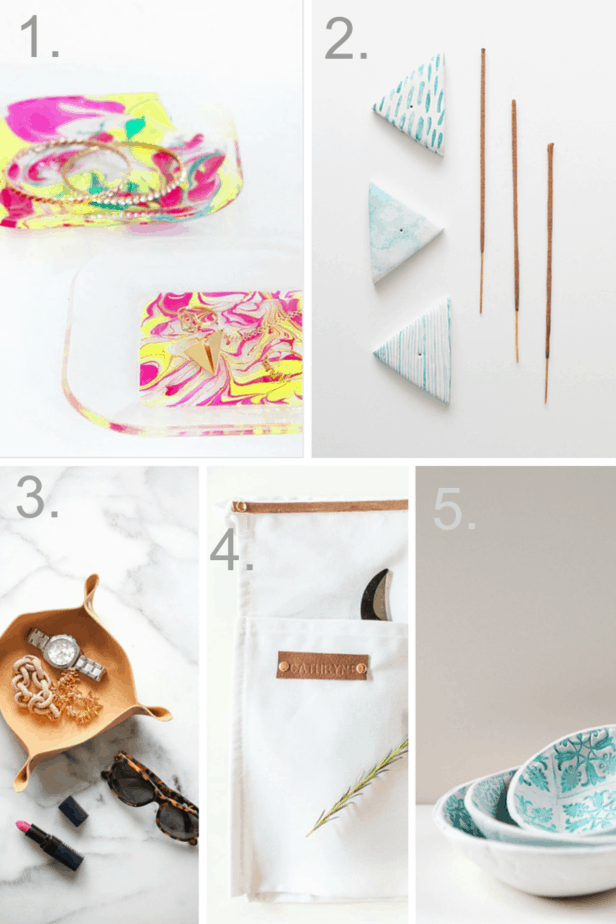
  1. Faux Marble Tray by Jenni
  2. Incense Holders by Molly
  3. Leather Catchall by The Everygirl
  4. Floral Apron by Ashley
  5. Stamped Clay Bowls by Emma

Those jewelry dishes though! Whew! Did you see any inspiring craft projects this past week? Are you interested in trying any of these out? Let me know what you’re up to this weekend and if there will be any crafting involved!

Always remember to pin from the original source and let’s DIY!
Follow Shelly @ DIY Mama’s board Crafty Gifts on Pinterest.

Sewing Machine Cover

Hello and welcome to Sewing with Shelly! I’m about as novice as one can get when it comes to sewing. I can do a straight stitch all day long but ask me to do a button hole, pleats or embroidery and I’ll go straight to YouTube. That’s why I loved this simple diy sewing machine cover. Straight stitching and hot glue all day baby!

diy sewing machine cover
I’m not sure what compelled me to make a sewing machine cover because it is always hidden in a closet. I’m pretty sure it’s because I wanted to make something with that precious pink pom pom trim and my friend Pinterest lead me to this darling cover for my sewing machine.

sewing_materials
Materials Needed:

  • 2 yards of coordinating pattern fabric
  • 1/2 yard of solid fabric
  • 1 1/2 yards of pom pom trim
  • Coordinating thread
  • Glue gun
  • Sewing machine

I followed the instructions on this sewing machine cover tutorial by Bari J but did not add the lining. I slightly modified the pattern by adding a strip of white at the bottom to make the pom pom trim to pop!

messy_crafts
The instructions were very simple to understand as long as you kept your pattered fabric straight. Above is proof that I never do one project at a time. I was working on Sophie’s Olaf Poodle Skirt at the same time.

pom pom trim
I glued the pom pom trim on the bottom of the unhemmed cover because I like to save time if possible. Also, I was afraid my stitching would be wonky and it would look silly. I tacked the trim every few inches and know that I can just re-glue if I get too rough with my cover.

sewing_machine_cover_detail
trim_complete
I chose to not add the lining of the cover according to the tutorial because once I got this far, it looked complete enough for me. I do think it could be cute with a side pocket to keep a small pair or scissors, chalk or measuring tape but I’m already utilizing a pretty great sewing kit that holds everything I need.

sewing_machine_cover_done
Definitely the cutest craft I’ve ever made! I have complete faith any other novice seamstress could make this cover with flying colors. What was your latest sewing project or are you more of a heat-n-bond type person (that’s how all of my curtains are hemmed)?

Let’s DIY

Hello lovely readers! Is anyone else plain ole exhausted from this week? The lil bean has been in rare form all week (possibly teething) and I had to resort to ice cream last night to unwind (I’m not a wine girl and Whole30 is now starting next Monday). I am very thankful the sun was shining and our whole family was healthy! I seriously want to get on these crafts this week but I think I’ll be doing some heavy purge/organizational projects for the #40bagsin40days challenge we’re doing.

15.2.19

Here were my favorites from this past week:

  1. Stamped Whale by Rachel
  2. Felt Jewelry Pouch by Corey
  3. Marbled Frame by Rachel
  4. Wood Bead Key Chain by Amanda
  5. Magazine Rack by Robyn

Hi, my name is Shelly and I’m addicted to DIY keychains! I’m almost positive that 30% of my DIY board on Pinterest is key chains. Also, I don’t read magazines anymore but how cute would that copper magazine rack be holding kid’s books in Soph’s room?! SWOON! Are you doing any crafting or creating this weekend? I’d love to know what you’ve been working on!

Please don’t forget to pin from the original source.

Let’s DIY

Hello party people! I’m guessing you’re as excited as I am that it’s Friday! Any plans for Valentine’s Day? I’m going out for sushi and martinis then watching 50 Shades and then dancing with 9 other girls tonight! Yes, you may now judge me how you will, for going to see that horrendous movie. I have zero plans for Valentine’s Day other than spending it with my loves at home and possibly eating chocolate.

lets_diy_2_13

Here were my favorites from this past week:

  1. IKEA Hack Nesting Tables by Classy Clutter
  2. Dress Up Rack by Lay Baby Lay
  3. Heart Quilt by A Quilt is Nice
  4. Macrame Yarn Garland by A Beautiful Mess
  5. Mini Heart Vinyl by Hello Lidy

Do you plan on getting crafty this weekend or will you be pinning one of these for later? Obviously, I want to re-create every one of these, but I’m especially loving the dress up rack idea! Soph’s too young for dress up but this will be great in a year! Let me know which is your favorite and please always pin from the original creator.

DIY Valentine’s Day Cards

Hello loves! What month has 28 days? All of them! Get it? Really though, I love that February has only 28 days because it’s almost always gloomy and snowy. Thankfully, Valentine’s Day is smack dab in the  middle to look forward to!

DIY Valentine's Day Cards

I’ll admit, I’m a fan of Valentine’s Day. I do believe it’s a ‘Hallmark Holiday’ but I love sending love to those I care about.
I was excited when Paper Source contacted me to use their Mini Valentine Kit to make my Valentine’s Day cards this year.

Their mini kit was anything but mini! There were enough supplies to make 30 cards! The only thing you would need to complete the cards are a pair of scissors and a pen. I also used glue dots for the pieces I wanted to lay flat. I loved the dimension the foam mounting tape (in the kit) created. I’d never used them before and will be buying some for scrapbooking!

DIY_valentine_stickers

I liked the challenge of making each card a little different and using some of the products unexpectedly. The red circle stickers were meant as envelope sealers but I used them as polka dots.

DIY_valentine_materials

The pens I used were Zig markers, Micron pens and Posca paint pens. Make sure to give all pens a min to dry so they don’t smear. I had the Micron smear on the envelope and Posca pen smeared on a card.

DIY_valentine_card_fiona
DIY_valentine_cards

These cards definitely look hand made but having the pre-cut hearts and coordinating papers made it so easy to mix and match materials to make many unique designs.

DIY_valentine_card_envelope
DIY_valentine_card_envelope_sealed

My favorite part was writing love notes on these mini cards, stuffing them in these sweet translucent envelopes and sealing them up to send to my Valentines!

DIY_valentine_hot_chocolate

I filled little cellophane bags with Martha Stewart’s hot chocolate recipe to go with my Valentines. Sophie decided it would be best if she tested each bag before sending them out! What do you do to celebrate Valentine’s Day? I’m super excited to be able to help Sophie make Valentine’s for her friends in a few years.

For more Valentine’s Day ideas, check out my Pinterest board!
Follow Shelly |DIY Mama|’s board v-day. on Pinterest.

Google+